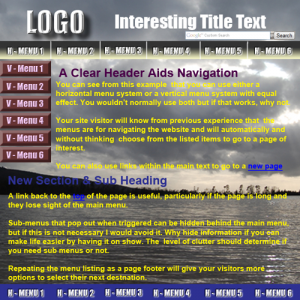
A Website Design Guide for Beginners

Website Design GuideFor many people the thought of getting a website published for themselves or perhaps to represent a small business they are operating looks fraught with potential technical problems. And let’s not beat about the bush, there are technical aspects to designing a website that can be quiet daunting for a non-technical person or sometimes even for a relatively competent technical person.

That is why there are people that can be employed to take on the task on your behalf and at a relatively low cost. Trouble is that you do need to have an idea of what is required and to know what it takes to put together a website that actually functions and, if you want it to, gets found by search engines.

This Website Design Guide does exactly that, but in a language that is jargon free and easy to understand. Probably the easiest way of describing what topics the book covers is by listing the Table of Contents.

  • Part one
  • What are the costs of designing a website?
  • What do you want your website to do for you?
  • The way it looks – style
  • What it does – functionality?
  • Finding your way around the website
  • How to make Google your best friend – on page optimisation
  • Ensuring a website fits all standard computer screens
  • How to ensure you can update your own content easily
  • Maintaining a uniform look
  • Using flexible web pages to make adding content easier
  • Registering a domain name
  • Hosting your website
  • How Google ranks your website – off-page search engine optimization
  • Website performance
  • Benefits of a well-designed website
  • Briefing a designer
  • Part two
  • Website costs from a designer perspective
  • Website or blog?
  • Taking a static web design approach
  • Using flexible web pages to make adding content easier
  • Optimising website pages – the technical perspective
  • Organising your information for your website
  • How to put your website on the Internet
  • Reference Information

Part one is essentially for anyone that wants to understand website design in relatively simple terms, so that they can discuss their requirements with a website designer.

Part Two is more geared to the have a go technically competent person that wants to get his hands dirty by designing his own website. This can be done by either using a combination of HTML and CSS to create a very functional and easy to maintain static website or by utilising the WordPress blogging platform to create a blog or in fact a static website (this is very feasible using WordPress) adopting a content management system approach.

Obviously the second part is much more technically challenging and involves going through a learning process to familiarize yourself with the techniques needed. But there are references to some excellent training tutorials and techniques that illustrate the best approaches to creating a fluid website design that is easy to update and maintain.

Clearly I think that for anyone, who needs a website, this guide is invaluable. But then I did write it so I guess I may be a little biased 🙂 I am however prepared to take on board the opinions of others, so if anyone would like to review the book and let me know what they think or in fact if you would like a copy for free in exchange for an honest review, let me know via the contact us page.

You can purchase the book from Amazon.co.uk and Amazon.com . Or if you use any of the other Amazon sites then just change the extension to suit your preferred site.

Posted in website design, website design costs | Tagged , , , , , | Leave a comment

What is an eBook and Why Would You Convert a pdf to eBook Format

Since recent changes in technology have been introduced, bringing more and more mobile devices onto the market at an exponential rate, the question ‘what is an eBook?’ should be something that anyone who owns one of these devices should be able to answer.

Likewise if you are a writer of books or a publisher of information in printed format, you will also need to understand exactly what an eBook is, otherwise you could be missing out on a massive market for your products by simply converting your printed, hardcopy medium into a digital medium.

Simply put: “an eBook is a replica of a printed book delivered in a digital format that can be diplayed and read on an eReader”.

Unfortunately life is not quite that ‘simple’ and the reason is that eReaders come in many different forms and require different types of digital files in order to be able to easily interpret the data and display the text in a way that looks much the same as a printed book (or other documents in printed format).

One of, if not, the most popular eReaders is the Amazon Kindle. Developed and sold initially by Amazon to support their massive presence in the book selling market place. The Amazon Kindle is now available in high street stores as well as through the Amazon website. Amazon tell us that sales of Kindle formatted eBooks is now outstripping sales of standard printed books on their Internet site.

There is probably a good reason for that, and a lot to do with because they took a great deal of trouble, during the development of the Kindle, to ensure that the screen that displays the text, looks very much like the printed page of a book; even in direct sunlight. In fact, put the Kindle in it’s own case and you can convince yourself that it is just like reading a normal book. Lightweight, easy to move from one page to the next plus you will always return to the point you stopped reading if you need to put the device down.

There are of course other benefits associated with using an eReader as your preferred choice for reading books: –

  • Muliples of books can be stored on one device, usually in the hundreds
  • Digital files can be accessed quickly and easily over the Internet
  • Most eReaders provide the facility for you to bookmark and add notes to pages as you read
  • You can change the font size to a preferred size to suit you
  • Some eBooks can bring other mediums to the reader to enhance the reading experience
  • Links can be provided to take the reader to other resources on the Internet for use as required
  • eBooks are very portable

As there are advantages, there must also be disadvantages and these are summarised as follows:

  • You do of course have to have an eBook reader which involves an initial cost outlay
  • Not all readers are as easy on the eye as a printed book
  • eBooks need power and an energy source for recharging them
  • They have to be handled with a little more care to ensure they are not damaged
  • Graphics and colour pictures are not always so prominent and clear

Some Technical Aspects of eBook Formatting

Hopefully the information above has answered, in a nutshell, the question of ‘what is an eBook?’. So now onto the more technical aspect of converting a pdf to ebook’ fomat.

A statement which is in itself a bit of a contradiction, because a pdf (portable document file) is actually a form of eBook. It is a file that, normally, has been converted from a wordprocessor file of some sort (again there are a few, Microsoft’s Word ‘.doc’ being one of the most popular) into the pdf format.

The Adobe software group are the perpetrators of the .pdf (portable document file) and provide free programs (links below) that can be downloaded onto a PC in order to read the file. The purpose of a ‘pdf’ file is that it provides a facilty to read the contents of the file on a PC but without the facility to edit the file easily. In fact you will normally find that most pdf’s come with some level of security protection included so that the files cannot be easily edited, changed or sometimes printed.

Many book authors will be in possession of .pdf versions of their printed books which, when viewed on a PC or any other device that can interpret pdf files, will look to all intents and purposes just like the printed book. That may be the reason that so many people search the Internet to see what it takes to convert a pdf into other eBook formats. So when someone says they want to convert from pdf to eBook, what they actually mean is to convert to an alternative eBook format.

So what are the other eBook formats, where are they used and what are they used by? Let’s look at some of the best known: –

The ‘PDF’ format already discussed is best for your home PC or laptop and is also good for printing (security settings allowing).

The ‘EPUB’ format is your best choice for Nook, Sony Reader, KOBO and most reading apps; including Stanza, Aldiko and Adobe Digital Editions.

Use the ‘MOBI’ format for Kindle and Kindle apps, noting that Amazon have their own proprietary file format which is the ‘AZW’ it is based on ‘MOBI’ but is slightly different. That said the Kindle will read and display properly formatted ‘MOBI’ files without a problem.

To read ‘PDF’ files, as books, on desktops and laptops, you will need Adobe Reader.

To read ePub books on desktops and laptops you can use the free Adobe Digital Editions software app.

To read any Kindle books on your desktop or laptop you can download the Kindle Previewer software from Amazon.

Converting Digital Files to eBook Format

Probably the easiest route to eBook Publishing is to convert your files to the Kindle format and publish them on Amazon using the ‘Kindle Direct Publishing’ option. You can visit Amazon Self Publishing Help page for advice on that option.

I personally convert the files to ‘MOBI’ from a Word document saved as a filtered web page using the ‘Calbre’ program. This is after I have stripped out all the unnecessary styling, spaces and tabbed indents from the Word document to keep it as simple as possible. Then I upload the finished ‘MOBI’ file to Amazon along with a decent cover image in ‘JPG’format.

The other major option for eBook formatting is to convert files into the ‘EPUB’ format. Where this is relatively simple to do in the first instance, i.e. you can save a wordprocessor file as a filtered web page (following the same simplification rules above) and then open it with a program called ‘Sigil’. The problems arise when you then format it in Sigil and save it as an EPUB. The reason for this is as follows:

To be accepted by major distributors of EPUB files, the finished file has to be to an acceptable standard and will have to pass what is called an ‘epubcheck’ without any errors or warnings.
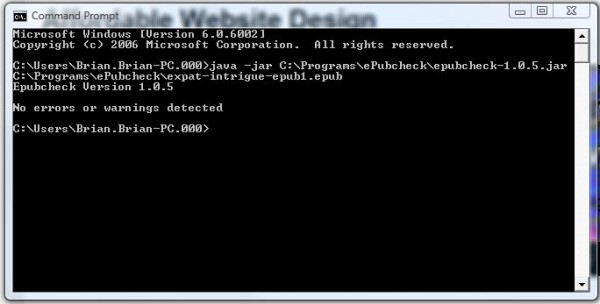
PDF to Ebook

It is this last part of the process that causes most people problems, because there are are no hard and fast rules documented describing how you actually achieve this. There are so many different potential conflicts involved, that can cause the file to fail the check, that many people simply give up.

There are guidelines that exist that will describe the best approach to formatting your intial wordprocessor files, basically it is avoiding any unnecessary formatting and bad practices so that when you do hit problems they will be hopefully limited to a few easy to find ones.

Smashwords have a guide that will take you down that route if you want to try and take the process on yourself. They also offer a service for putting wordprocessor files through their ‘meat grinder’ and submitting the books to the major distributors on your behalf. But even their process is not guaranteed and you do end up relying on them rather heavily to get your book in front of an audience.

Below is my method for converting files to eBook Format

Images & Cover

All images are to be produced to a suitable size (see below) and can be in jpeg, png or gif format.

Images should be inserted from a file, centered and anchored ‘in line with text’ under layout options. Make sure the maximum width of any image is no more than 500px.

Cover Images:

Needs to be professionally designed

Optimum size for Amazon is 1250 x 2000

ePub created in Sigil for self distribution (Sigil lesson recommends 590 x 750)

mobi created in Calibre 1250 x 2000

Formatting for Word Documents:

Firstly, turn off autoformatting as follows: in Word 2003, go to ‘Tools’>>’AutoCorrect’
then click on the ‘AutoFormat As You Type’ tab and then uncheck most of the boxes (you can keep ‘replace straight quotes with smart quotes), then click on the “AutoFormat” tab and uncheck the four boxes under “Apply.”

For paragraph formatting select one of two options by setting the parameters in the ‘formatting paragraph window’ which is accessed via ‘Format’>>’Paragraph’ in Word 2003

1. First line (under ‘Special’) indent 1cm (under ‘By’) and no spacing between paragraphs. Single line spacing with no spacing defined.

2. No indent but spacing after paragraph set at 6pts

That’s it really, keep it simple and try not to mix the different options any more than is artistically necessary.

Alignment:

Left aligned or justified (Set this in the styling for ‘Normal’accessed via ‘Format’>>’Styles and Formatting’)

Font:

Font size is 12pts for content text and 14pts for headings.
Style should be ‘normal’ for all content text where possible at 12pts.
Headings can be 14pts, bold and centred. They should be a single line to suit Adobe Digital Additions TOC where possible.

TOC (table of contents) is optional, where required use a bookmark next to the heading and insert a hyperlink for the bookmark in the TOC.

The TOC bookmark needs to be called ref_toc, also use lower case and underscore for all other bookmarks.

Font to be a standard simple font, recommendations are Times Roman, Arial or Tahoma. Bold, Underlining and or Italics can be used to highlight text sections as required. You can also use blocks to define different sections to stand out from main text.

Preparing Word files for conversion:

My method, format the Word document to simplify and normalise all text (as above), then add in headings, graphics, TOC (if required) and special features, following the rules defined above.

Update the ‘title page for ISBN assignment and copyright e.g © Brian Stephens 2012 depending on where it is to be distributed.

_______________________________________
Book Title Main Heading
Volume No. (If Required)
Book Title Sub Heading
Author
© AN Other 201*
(ISBN: ***-**-*****-**-*)
Copyright statement to suit distributor
________________________________________

If you are unable to solve formatting problems copy whole document into a text editor (Notepad for example) and then paste it into a new document for reformatting to the rules above.

Avoid unnecessary hard returns and don’t use tabs or spaces. Text boxes will not work and neither will bullets in all cases, do this manually if they are essential. TOC have to be inserted manually

Refer to Smashwords Style Guide for more detailed information.

Once everything is finalised save the document as a ‘filtered web page’in an appropriate file directory.

Creating ePub files:

Open the filtered web page you should have created earlier in Sigil.

Using ‘tools’ fill in the metadata information for ‘Book Title’, ‘Author’ and ‘Language’.

At the very beginning of the page insert the Cover Graphic for the book using a 590 x 750 image.

Insert a ‘chapter break’ after the cover image.

Go into the images menu and define the cover image as ‘Cover Image’ by right clicking on the image and then selecting ‘Add Semantics’.

Insert ‘Chapter Breaks’ after the title page and at the end of each chapter.

Note Sigil can be used to format additional features and when opening a file make sure code tidy is selected to get rid of erroneous problems. Refer to Sigil Lesson for more detailed instructions.

Save as an ePub to a directory of choice.

When formatting is completed perform an ePub check using the instructions located at http://code.google.com/p/epubcheck/wiki/Running.

The finished file must pass with no errors or omissions. Also check file looks OK by viewing in Adobe Digital Editions

To fault find look for the error reference in epubcheck and search for the corresponding line in the Sigil code view, that is where you need to assess what the problem is.

Creating mobi files:

Add the filtered web page to Calibre

Select ‘convert files’ and immediately choose output file as mobi.

Update the metadata information for Title, Author and Publisher. Go into the TOC option and check ‘Do not add detected chapters to the Table of Contents’.

Add search tags and series data as required then click on OK. Once completed use the Calibre viewer or Kindle Previewer to check format is OK

Creating pdf files

There are several ways to create a pdf file, my favourite is to open the standard Word file i.e. not the filtered web page in Open Office and save it as a .odt file. Rearrange the pages to look like the printed version if there is one (this can be done in Word before changing to odt if preferred). Otherwise just format it such that everything looks well organised and spaced.

Insert a TOC (table of contents) for it to work in Adobe Reader, note Adobe Digital Editions creates the TOC in the sidebar by picking up the header information, so you may decide a separate TOC is not strictly necessary.

Now there are 2 options:

Export the file as a pdf adding a permission password to prevent changes to the file,this makes the file a security enabled .pdf. and you are done. Just save the export to a suitable directory.

If on the other hand, you have the complication of sections with different numbering formats for each section, then save the file as non secured and once in pdf format open the file with Adobe Acrobat and adjust the numbering using Acrobat to suit requirements (this is the only way to achieve this). When finished save as a secure file, remembering latest versions for the security will mean the file cannot be read with digital editions, so an older format will need to be applied until such time Digtital Editions is updated. save to a preferred directory and you are done.

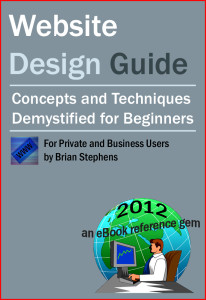
The 2 books in the sidebar are examples of eBooks formatted and published on Amazon UK by Moulin Publications. These are the same two books on Amazon USA:
Posted in eBook Publishing | Tagged , , , , , , , , , , | Leave a comment

WordPress Posts Disappeared Along with all the Pages

Can you imagine that, one second you are working away on your blogs, you notice a minor error in one of your posts and decide to fix it. Approximately 5 seconds later every post on your blog has disappeared.

Well that didn’t happen to me once, it happened on 3 different blogs, all using WordPress as  the blogging platform. To say I was in a bit of a panic would be an understatement. But as it turned out, after many hours of searching for a solution, there was no need to panic at all.

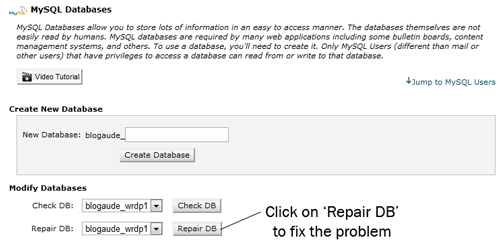
The problem came about as a result of a database problem. All I had to do was access the database using CPanel and then click on repair database. Three seconds after that everything was back to normal. All the posts and access rights were restored and it was like it never happened.

You can usually access CPanel by adding –  /cpanel  – after your domain name (website address) and then entering your username and password into the login box as requested.

Once in look for the ‘Database’ module and click on MySQL Databases as shown at the left of the image below.

When you get into the module you will see the ‘Repair DB’ button, just click on that to repair the database. That will fix the problem and you should be back to normal.

CPanel database repair button

Well we are on the subject however it is worth noting that you should always back up your database and posts etc. on a fairly regular basis that suits the way you work.

To back up your database – in CPanel locate the ‘Backups’ icon and click on it.

You should see your database listed, click on it to download. If a browser box opens just click on ‘Save File’ and then OK. Also make sure you know where it is being saved to so you can find it if you need it.  That’s all there is to it and its better to be safe than sorry.

Posted in Blogging | Tagged , , , , , | Leave a comment

What Does an Average Website Cost

When estimating the cost of producing an average website for initial publication on the Internet there are 3 principal cost considerations to take into account. These are as follows:

  • Buying a domain name
  • Web Hosting
  • Website design and development

Buying A Domain Name

The first thing to understand is that you never actually buy a domain name outright, it is leased on a year in year out basis and as a result will need to be renewed periodically as the lease period expires. Having said that the costs are really quite affordable. For example a standard .co.uk domain name can cost as little as £3 pounds a year and a standard .com domain name will cost around £10 a year. There is also a minimum period that you have to register the domain name for, but typically it will be for no more than 2 years and is more likely to be only 1 year.

Hosting A Website

Websites need to be hosted on a server that is connected to the Internet permanently and there are many companies that offer a web hosting service. Moulin Website Design offers a reseller hosting package which makes web hosting both more affordable and available over shorter minimum periods so that the costs for small businesses just starting out on the Internet can be kept to a moderate level. For example a starter pack (more than adequate for virtually all small businesses) begins at £3 a month for a minimum period of 12 months, so the cost per year for hosting is only £36.

Website Design Costs

There are a few different approaches to creating a website, the traditional route is to ask a web designer to produce a bespoke design to meet your requirements in terms of functionality, style and appearance. This approach is likely to be the most expensive option but can still be very affordable depending on the specification required. The cost will be dependent on a number of variables that dictate the design’s complexity:

  • How many pages are required
  • How much content you can provide i.e. text and graphics (photos)
  • Whether animation and/or video is required
  • Whether the site is required to be an eCommerce site i.e. shopping carts for online purchases is required
  • If a content management system is necessary

Once a specification detailing the requirements is established then a quote can be prepared to define the costs and time scale involved. But as a guide a simple website can usually be produced for anything from a £100 to £300 provided the required text and photographs are supplied.

To achieve the lower price it may be necessary to adopt an existing template which is populated with the text and graphics supplied and then modified to change the colours and font to suit individual tastes. Taking this approach generally means that the designer has far less work to do and can therefore charge less.

Finally with the development and greater sophistication of the blogging platforms now available, it is also very possible to utilise themes from programs such as WordPress to create a website, that for all intents and purposes, looks just like a bespoke website design. This is relatively quick and easy to set up and with a few modifications can soon be given a unique appearance. The added benefit of this is that they have a CMS (content management system) built in, making updates and modifications much simpler for the site owner and avoiding the need to pay the designer for any ongoing changes and updates.

So if you interested in making an investment in the future of your business, by giving it a 21st century marketing boost, then please get in touch via the Contact Us page. It doesn’t really matter where you are in the world, this is exactly the type of business that can be done over the Internet or on the telephone, all it takes is a short conversation or email to get started.

Posted in business blogs, website design, website design costs | Tagged , , , , , , , , , | 1 Comment

How to create a site map for submission to Google

How to create a sitemap following Protocol 0.9

Navigation for Websites

When creating a site map for submission to Google you have to create it an XML format. What you are effectively doing is making a complete list of all the pages on your website that you want the search engines to find, you would not include pages you don’t want them to find e.g. a ‘Thank You’ page for a feedback form submission.

Its fair to say that under normal circumstances the pages of relevance to a website will be found by the spiders as long as an effective navigation scheme has been implemented i.e. you have used a sensible menu system which is primarily text based and that links to all the public pages of your website in an easy to follow manner.

A lot of webmasters tend to use ‘flash based’ or ‘graphic’ images for their menus to enhance the aesthetic look of a website. The problem is that these types of menu systems are more difficult for the search engines to crawl and it is possible that certain pages linked to in this way may not be found. Providing a site map should overcome this problem also using the ‘alternative text’ option and an intelligent file naming system for graphics will also help to an extent.

Additional functionality of sitemaps:

to advise the search engines how often pages get updated
to advise search engines when a page was last updated on a page by page basis
how important you think each page is on a scale of 0 to 1, this is your own personal ranking and is not affected by external ranking and indeed does not influence external ranking.

Google uses Sitemap Protocol 0.9 which is a protocol that is recognised by many of the other major search engines and any that have adopted the standards of sitemaps.org. for XML sitemaps.

Google states that sites are never penalized for submitting a site map, but they also do not guarantee that just because you have submitted one that you will get all your pages indexed or ranked as a result.

So I guess that by submitting a sitemap there will be nothing to loose but potentially you could benefit, and I stress potentially.

There are 2 types of sitemaps, the one being discussed here is the type you submit to Google for the reasons stated, its format will be Sitemap.xml (capital ‘S’ for Sitemap)

The other type is one that you might release on your website, probably in ‘html’ format i.e. sitemap.html (lower case ‘s’ for sitemap), this is for the benefit of your visitors to help them navigate your website and can be in pretty much any format you feel is fit for purpose. I have only mentioned this type so that you know the difference.

Below is a sitemap example in the XML format that I have submitted and had approved by Google, it follows the relevant protocol and gives Google all the required information it needs to navigate my website.

It is a fairly straight forward and simple website but does illustrate how the protocol is constructed so that you can copy the format and add or remove pages as required, all you need to do is change the URLs, dates and importance of the pages to suit your website.

The date format is year, month, day yyyy-mm-dd

Alternatively there will be a Google site map generator that can be used for creating Google sitemaps for standard websites where perhaps the structure is a little too complex for manual generation as per the sample.

There are other generators available for use with blogs e.g. WordPress blogs, these usually come in the form of a plugin widget and can be really useful because blogs tend to work chronologically and with categories rather than using standard navigation methods.

Sitemap code in XML to suit the protocol adopted by Google

<?xml version="1.0" encoding="UTF-8"?>
<urlset xmlns="http://www.sitemaps.org/schemas/sitemap/0.9">
<url>
<loc>http://www.french-holidays-aude.com/</loc>
<lastmod>2009-08-08</lastmod>
<changefreq>monthly</changefreq>
<priority>1.0</priority>
</url>
<url>
<loc>http://www.french-holidays-aude.com/accommodation.html</loc>
<lastmod>2009-08-08</lastmod>
<changefreq>monthly</changefreq>
<priority>0.8</priority>
</url>
<url>
<loc>http://www.french-holidays-aude.com/location.html</loc>
<lastmod>2009-08-08</lastmod>
<changefreq>monthly</changefreq>
<priority>0.7</priority>
</url>
<url>
<loc>http://www.french-holidays-aude.com/links_page.html</loc>
<lastmod>2009-08-08</lastmod>
<changefreq>monthly</changefreq>
<priority>0.6</priority>
</url>
<url>
<loc>http://www.french-holidays-aude.com/gallery.html</loc>
<lastmod>2009-08-08</lastmod>
<changefreq>monthly</changefreq>
<priority>0.9</priority>
</url>
<url>
<loc>http://www.french-holidays-aude.com/travel.html</loc>
<lastmod>2009-08-08</lastmod>
<changefreq>monthly</changefreq>
<priority>1.0</priority>
</url>
<url>
<loc>http://www.french-holidays-aude.com/travel_shop.html</loc>
<lastmod>2009-08-08</lastmod>
<changefreq>monthly</changefreq>
<priority>1.0</priority>
</url>
<url>
<loc>http://www.french-holidays-aude.com/travel_shop2.html</loc>
<lastmod>2009-08-08</lastmod>
<changefreq>monthly</changefreq>
<priority>1.0</priority>
</url>
<url>
<loc>http://www.french-holidays-aude.com/travel_shop3.html</loc>
<lastmod>2009-08-08</lastmod>
<changefreq>monthly</changefreq>
<priority>1.0</priority>
</url>
<url>
<loc>http://www.french-holidays-aude.com/travel_shop4.html</loc>
<lastmod>2009-08-08</lastmod>
<changefreq>monthly</changefreq>
<priority>1.0</priority>
</url>
<url>
<loc>http://www.french-holidays-aude.com/travel_shop5.html</loc>
<lastmod>2009-08-08</lastmod>
<changefreq>monthly</changefreq>
<priority>1.0</priority>
</url>
<url>
<loc>http://www.french-holidays-aude.com/travel_shop6.html</loc>
<lastmod>2009-08-08</lastmod>
<changefreq>monthly</changefreq>
<priority>1.0</priority>
</url>
<url>
<loc>http://www.french-holidays-aude.com/travel_shop7.html</loc>
<lastmod>2009-08-08</lastmod>
<changefreq>monthly</changefreq>
<priority>1.0</priority>
</url>
</urlset>

Submitting a Site Map to Google

In order to submit a sitemap to Google you need to open an account in Google’s ‘Webmaster Tools‘.

Once you are registered you will need to add your site’s homepage URL and verify it, usually by adding a meta tag to the head section of the index page or header page of your blog, then by publishing the updated file so that it is live.

If successful Google will register the verification and take you to the ‘dashboard’ page of that URL where on the bottom right you will see a link saying ‘submit a sitemap’. Make sure you have configured your Sitemap as required in line with the code above and that you have published it to the root directory of your website so that it is live, then click on the link.

The next page will have a button that says ‘Submit Sitemap’, you click on it and complete the URL address for your website e.g. http://mydomain.com/Sitemap.xml.

Then you click on the ‘Submit Sitemap’ button next to the URL name, after that you should get a message saying the sitemap has been submitted and to check back later to see if it has been approved, this may take a few days.

Posted in Sitemaps | Tagged , , , , , , , , | 1 Comment