Changing your Google Blogger template is a fairly straight forward process and can be done relatively quickly and problem free particularly if you are changing one of the standard templates for another.
Making a backup
Before you start making any changes it is a good idea to create a full back up of your blog. To do this go to Layout tab via ‘Customise’ in your menu bar at the top of your blog view, assuming you are signed in of course.
Select ‘Edit HTML’ where you will see a ‘Download Full Template’ hyperlink.
Click on the link and from the call to action box check the ‘Save File As’ option and then click ‘OK’.
This will download a full copy of your existing blog and all its settings to your hard drive as an XML file. Just remember to note where you are saving it to so you can find it again and jot down the full file name in case you have to search for it.
Restoring your blog is done from the same screen and all you do is browse to the required XML file i.e. the one you saved earlier and then click on ‘Upload’. Your original file will then be written into your code box, hopefully you will not need this option.
To replace your template with a standard Blogger template
 Still in the ‘Layout’ tab you can select ‘Pick New Template’, you will then be presented with a number of different template choices with options to change the colours to one of preference.
You can preview each template in the the various colors, so its simply a case of working through the various templates and having a look, then when you find one you really like simply click on ‘Save Template’ then go and view the finished result.
You may find that some of your pictures and text may need tweaking slightly if you have selected a completely different arrangement i.e. the positioning may not be optimal, but other than that things should have been configured pretty much automatically with all your widgets and ads still in place.
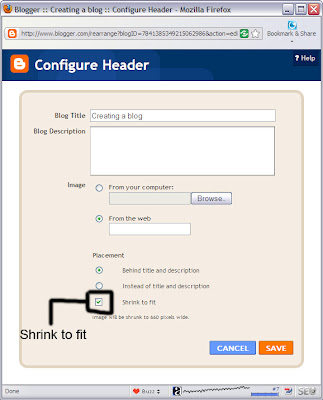
 To modify the header of your blog so that you can use an image of choice, you go to the ‘Page Elements’ option from the ‘Layout’ tab and where it says ‘Creating a blog (Header)’ click on the ‘Edit’ hyperlink.
You will now be presented with a box that allows you to upload an image that can either sit behind your existing header text or can replace it completely.
If you have no photo editing software it would be a good idea to click the ‘shrink to fit’ check box so that the image is automatically sized to the right width for your blog, assuming it has more pixels than the blog width in the first place.
Make your choice for replacing or sitting behind your current header then click on’Save’.
You can go and look to see what it looks like by viewing your blog. If you don’t like it go back to the same screen and select ‘remove image’ and save. That will put you back where you started.
Photoshop Elements is a great software program for editing your graphics to the size and format you want for that special effect, check out the details by clicking on the link.
Using a 3rd party template
There are lots of free Blogger templates on the Internet, I provided a post on some free templates earlier where you can access a few options.
For this particular source of templates you will need to copy the code they provide you with into the Edit HTML box of your blog.
This is done in the ‘Edit HTML’ screen you visited earlier when making a backup of your blog, simply delete all the code that is in the box and replace it with the code from your 3rd party supplier.
 You can preview the result before saving and simply discard the changes if you don’t like the look of the finished result.
A word of warning, many of the templates produced come with some errors, so you need to be sure the look is worth the risk.
Also many of the standard widgets you had installed could be lost and you may need to figure out how to put them back. This may or may not be easy and could require a level of tweaking and perhaps sacrificing some of the options you previously had working for a better look.
That said, often the templates are fine and don’t cause any problems, also don’t forget with a full back up available you can always just revert to your old format, so its not that big a risk.
While we are on the subject of the ‘Edit HTML’ screen, this is where you can go to play around with colors, sizes and other options, it depends on what you are trying to achieve how much you change these parameters, but you can configure things to look significantly different from here.
Always create a full back up before you start so you can go back if you need to and remember you can preview and discard before saving if you don’t like what changed.
Knowing coding certainly helps when you are editing HTML code but there are some things that can be changed even by a complete novice without too much risk, colours, widths, font types and so on, you just have to be careful and check as you go along.
So there you have it, go make your Blogger blog look a little more unique.


